| Ultimate Drip Irrigation Kit for Raised Bed Gardening |
Congratulations on your purchase of a Ultimate Drip Irrigation Kit for Raised Bed Gardening. Please take a few moments to read through this instruction manual to familiarize yourself with all the parts of this kit. Installation instructions are included at the end of this manual.
INSTALLATION SUGGESTIONS:
The following diagrams are provided as general suggestions. Your kit may not have all the items listed. These diagrams describe common use situations. Larger versions of these diagrams as well as additional diagrams can be found in our online classroom at dripdepot.com.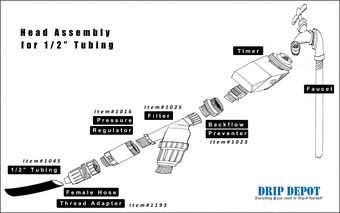
SPECIAL NOTE FOR GRAVITY KITS:
Limits and capacities of gravity drip irrigation systems is dependent on vertical distance of water source above target watering zone. Actual capacities and limits will be less than those listed below. Some of the instructions in this manual may not apply to gravity kits, ultimately these are just guidelines, your situation may require a modified approach based on your particular environment variables.PLANNING YOUR SYSTEM:
Before assembling your new drip irrigation kit from you should have a general idea of the type of layout you want to achieve. Here are some design tips that you may find helpful.- Mainline Layout
- Decide on the best path to lay out your mainline tubing. Try to get your mainline tubing as close as possible to the plants or containers to be watered. A zig-zag or "S" shaped layout can sometimes be helpful.
- Emitter Spacing
- Many variables such as soil type and watering schedule will affect the recommended spacing for drip emitters. In general, a 12" spacing between emitters works well. Spray jets and sprinklers should overlap for even coverage. Adjust spacing to suite your particular environmental requirements.
- Dripline
- Dripline (both 1/4" and 1/2") are a great way to evenly wet a large area without having to punch in a lot of drip emitters. Dripline is also well suited to making "drip rings" around trees and bushes. Dripline is basically tubing with the drip emitter already placed inside the tubing with a small hole for the water to drip out.
- Plant Requirements
- The process of ensuring that all plants have the correct amount of water is called "balancing" the system. If you have plants with drastically different water requirements such as hanging baskets versus large trees, you'll find that balancing your system will be challenging. In a situation like this you have 3 options.
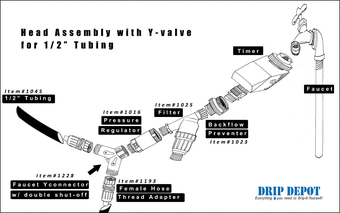
- Split the system into two or more zones.
(see Zones below) - Add or remove emitters.
You can always use more or less emitters or sprayers on each type of plant. This approach will allow you to apply more/less water to individual plants during a watering cycle. - Add valves.
You can add manually operated valves to either 1/2" tubing or 1/4" tubing. Adding valves will allow you to turn on/off certain sections of the system. This solution requires manual intervention and therefore eliminates the possibility of fully automating the system.
- Split the system into two or more zones.
CAPACITY AND LIMITS OF YOUR DRIP SYSTEM:
Drip irrigation tubing has limits on how much water it can carry and how far that water can travel. These limits can fluctuate based on many variables. To simplify things just remember these guidelines...- 1/2" Tubing: 200/200 rule
- Accumulated GPH ratings of all emitters on any single 1/2" zone should not exceed 200 GPH. No single flow path should exceed 200'.
- 1/4" Tubing: the 30/30 rule
- Accumulated GPH ratings of all emitters on any single 1/4" zone should not exceed 30 GPH. No single flow path should exceed 30'.
These guidelines are very conservative. In practice the actual limits can be much greater however, we choose to err on the side of caution to ensure a working system in the majority of situations. You will know if you have exceeded your limits if your system begins to sputter, surge or go dry in certain sections. If you think you have exceeded your limits, you can test by shutting off or plugging the working emitters and see if that "jump starts" the non-working emitters. If so, you have exceeded your limits and you will need to think about zones or valves.
TO ASSEMBLE YOUR NEW KIT:
Your kit is designed to be connected to any standard garden hose spigot or end of a garden hose. Please keep in mind that 3/4" threads found on PVC pipe may look similar to garden hose threads however, they are completely different. If you mix PVC threads with garden hose threads, your system will leak, guaranteed.SPECIAL NOTE: These instructions may reference optional parts or procedures that are not included in your kit. Simply ignore these items.
Assembly of your kit can be broken down into two basic sections.
- Head Assembly: Assemble the parts necessary to attach the tubing to the spigot or hose end. Sometimes referred to as "starting" the system.
- Tubing and emitters: Layout the tubing and attach the drip emitters, spray jets or sprinklers.
- Backflow Preventer
- Filter
- Pressure Reducer
- Female Hose Thread Adapter
- Connect one end of the 1/2" tubing to the female hose thread adapter.
- Lay the tubing out in the desired location as close as possible to the plants to be watered. Bend the tubing around plants and obstacles as needed.
- Cut off any excess tubing that is not needed.
- Flush the line. Let some water run through the tubing to remove any debris that may have entered the line during shipment.
- Close the 1/2" mainline with a Perma-Loc hose end.
- Use the punch to punch a single hole in the 1/2" tubing.
- If the plant you intend to water is near the tubing you can insert a drip emitter directly into the hole you just punched. If the plant is further away then you can extend the drip emitter by using a 1/4" barbed connector and a piece of 1/4" tubing.
- You can use a stabilizer stake to secure drippers that are inserted into the end of a 1/4" line.
- Repeat as necessary.
REPAIRING YOUR SYSTEM:
- Punctures
- Punctures in 1/2" tubing which have been caused by either removing a fitting or incorrectly punching a hole in the wrong place and be fixed by inserting a goof plug. If the hole is worn you can use the large end of a goof plug. If the hole is too worn for even the large end of a good plug you will have to splice the tubing (see below)
- Damaged Tubing
- Damaged tubing can be fixed by cutting out the damaged section and splicing the two pieces back together. Drip Depot 1/2" Perma-Loc fittings are reusable however, 1/4" barbed fittings are difficult to remove from the tubing and are generally not reusable. If you are good with a pair of pliers and a utility knife you can sometimes be successful in removing 1/4" fittings without damage to the fitting or yourself.
- Clogged Emitters or Sprinklers
- In areas that have heavily mineralized water, mineral buildup can occur inside the tiny orifices of the emitters. In this case, the only option is to replace the emitter and/or condition the water before it enters the drip system. Sprinklers and spray jets are more tolerant of mineralized water since their orifices are much larger than emitters, if they clog however, they must be replaced. Before replacing, be sure to check that you have not exceeded the limits of your system first. (see above)
WINTERIZING YOUR SYSTEM:
Before freezing weather occurs you should winterize your drip irrigation system by doing the following.- Disconnect drip system from water source and remove all head assembly parts including timer, backflow preventer, filter, pressure regulator and fertigator. Store in a weather protected area away from freezing conditions.
- Drain all water from the system by installing an automatic flush valve or blowing the water out of the line using an air compressor with no more than 25 PSI.
- Protect frozen tubing from foot traffic during freezing conditions or roll up and store in a safe place.