| Drip Irrigation Kit for Container Gardening |
Congratulations on your purchase of a Drip Irrigation Kit for Container Gardening from Drip Depot! The Drip Depot Container Kits come in two different mainline tubing size options. The Standard and Deluxe kits use 1/4" tubing throughout and are limited to a mainline distance of 30' in a single tubing run. The Premium and Ultimate kits use larger 1/2" tubing for the mainline and can stretch as far as 200' from the spigot connection in a single tubing run. We have listed separate instructions to assist you in the installation process. Please scroll through to find the instructions for the kit you purchased.
Standard and Deluxe Drip Irrigation Kits for Container Gardening Instructions
Please take a few minutes to read through these instructions and familiarize yourself with all the parts. For assistance with part names and details, you can print the list of parts included in your kit from the Kit item page on our website.
Drip Depot Irrigation kits are modular in design, as no two gardens are completely alike. Should you have any questions while installing your kit please feel free to email our Customer Support team or review some of our many resources in our Education Center, found by clicking the "Help" button in the menu bar on our website.
1. First step is to install your Head Assembly. Drip Depot Kits come standard with garden hose thread components for easy connection to your outdoor spigot or garden hose. Hand tighten only, no teflon tape or pipe dope is required with hose threaded connections.
a. Install the Backflow Preventer also known as a Hose Thread Vacuum Breaker, included in your kit, to the outdoor spigot. Ensure this item has the rubber washer seated completely down inside the female threaded connection prior to installation.
b. Next, install the Filter, included in your kit, to the vacuum breaker or backflow prevention device. Please ensure the rubber washer is seated completely down inside the female threaded connection prior to installation.
c. The Pressure Regulator is installed after the filter. Again, ensure the rubber washer is seated completely down inside the female threaded connection prior to installation. Please note the directional flow arrow on most pressure regulators for proper installation.
d. Lastly, the Female Hose Thread Tubing Adapter is installed on the outflow side of the pressure regulator. A helpful tip is to connect your tubing to the tubing adapter prior to connecting to your head assembly components. Most tubing adapters have a female swivel end for ease of installation.
*Please note: If using a hose-end water timer to automate your drip system the Head Assembly must be installed after or downstream of the timer or valve (see illustration below). Drip irrigation products are not rated for constant pressure use. Many municipal codes require the use of anti vandalism protection (set screw) on an outdoor water spigot backflow preventer. The J10 locking screw may qualify when properly installed directly on the outdoor hose bibb. If used on an automatic water timer for your irrigation system we recommend not tightening the screw as the plastic threads can be permanently damaged if backflow device is removed.
2. Determine the best layout for your ¼” mainline to reach all your container plants. Keep in mind the ¼” micro-tubing has a 30’ maximum single run length. Lay out the ¼” micro-tubing.
3. At each container you will cut the mainline and insert a Barbed Tee fitting. Then cut another section of the ¼” micro-tubing to reach from mainline tee fitting into the container. Attach one end of this tubing section to the barbed tee and the other end to the barbed inlet of the dripper.
4. Snap the dripper line into the Stabilizer Stake to secure, then insert the stake into the container.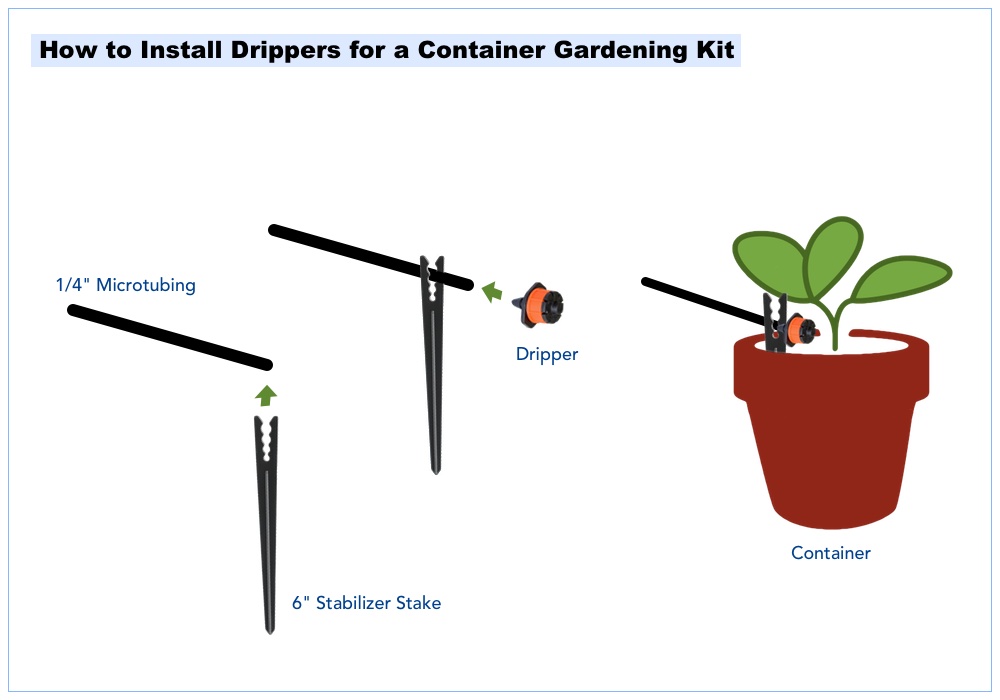
5. Connect the mainline ¼” tubing to the remaining barb on the barb tee and continue to the next container.
6. Repeat steps 3 - 5 until you reach the last container. With the last container you can just connect the dripper into the end of the ¼” micro-tubing, snap into the drip stake and insert into the container.
Tips:
- Containers over 12” in diameter may require more than one dripper for adequate coverage.
- To avoid over-watering or wasting water, containers are often watered for shorter time periods but more frequently than in-ground plants.
- Remember the 30/30 Rule for ¼” tubing: maximum 30’ run lengths and 30 GPH (gallons per hour) total flow. See the Tubing Buying Guide for details of tubing capacity.
- If you live in an area where the temperatures drop down to below 37 degrees Fahrenheit, you must winterize your system. See our Winterizing Instructions.
- For sample design layouts click here.

Premium Drip Irrigation Kit for Container Gardening Instructions
Congratulations on your purchase of a Premium Drip Irrigation Kit for Container Gardening with ½” Mainline from Drip Depot! Please take a few minutes to read through these instructions and familiarize yourself with all the parts. For assistance with part names and details, you can print or view the list of parts included in your kit from the Kit item page on our website. Drip Depot Irrigation kits are modular in design, as no two gardens are completely alike. Should you have any questions while installing your kit please feel free to email our Customer Support team or review some of our many resources in our Education Center, found under the "Learn" tab in the menu bar on our website. This kit utilizes ½” (.600” ID x .700” OD) poly tubing as the mainline making it a great choice for large decks and patios with container plants located farther than thirty feet from the water source or requiring more than 30 GPH total flow. Your kit includes items you may not need for your specific design but are included “just in case”. A coupler for the ½” poly tubing is included “just in case” your design requires coupling two sections of ½” tubing together such as in making a repair. A ½” tee is included “just in case” your design requires you to split your ½” mainline tubing in two different directions. If so, the kit does include two ½” tubing end caps. A ½” elbow is included “just in case” your design requires a tighter 90 degree turn in the ½” mainline tubing layout. ¼” Goof Plugs are included “just in case” you need to plug a hole that you punched into the mainline tubing that leaks or is no longer needed. Goof plugs are also used to close the ends of ¼” micro-tubing. Several ¼” tee connectors are included “just in case” you have containers larger than 12” that will require more than one drip emitter. You can use the tee in the section of ¼” tubing to split in two directions. Adjustable drippers on stakes are included “just in case” you have any water hungry plants in the same system zone with your other containers. These can be adjusted from zero to fifteen gallons per hour. 1. Installing your Head Assembly. Drip Depot Kits come standard with garden hose thread components for easy connection to your outdoor spigot or garden hose. Hand tighten only, no teflon tape or pipe dope required with hose threaded connections. Install the Backflow Preventer also known as a Hose Thread Vacuum Breaker, included in your kit, to the outdoor spigot. Ensure this item has the rubber washer seated completely down inside the female threaded connection prior to installation. Next, install the Filter, included in your kit, to the vacuum breaker or backflow prevention device. Please ensure the rubber washer is seated completely down inside the female threaded connection prior to installation. The Pressure Regulator is installed after the filter. Again, ensure the rubber washer is seated completely down inside the female threaded connection prior to installation. Please note the directional flow arrow on most pressure regulators for proper installation. Lastly, the Female Hose Thread Tubing Adapter is installed on the outflow side of the pressure regulator. A helpful tip is to connect your tubing to the tubing adapter prior to connecting to your head assembly components. Most tubing adapters have a female swivel end for ease of installation. *Please note: If using a hose-end water timer to automate your drip system the Head Assembly must be installed after/downstream of the timer or valve. Drip irrigation products are not rated for constant pressure use. 2. Mainline Tubing Installation. Determine the best location for your ½” mainline to reach from the water source to near the last container to be watered. Connect mainline tubing to head assembly. Lay out your ½” mainline tubing. If installing along wooden structures, your kit includes tubing clamps with nails to secure the tubing in place. Please note: The ½” poly is flexible and can be laid out with slight curves or “S” shaped zigzags if necessary. Cut off any excess tubing. Flush the line. Allow water to run through tubing to remove any debris that may be inside. Install the Perma-loc Tubing End Cap to close the line. 3. Installing the feedlines and drippers. Punch a hole into the mainline, near the container, using the ¼” punch tool included in the kit. Cut a section of ¼” micro-tubing to reach from mainline to inside the container. Attach a ¼” barbed coupler to one end of the micro-tubing and insert the barbed coupler into the hole you punched in the mainline. You should hear a snap or click once the barbed coupler is fully inserted. Attach the barbed inlet of a dripper to the other end of the section of micro-tubing. Snap the dripper end of the micro-tubing into a Stabilizer Stake and push the stake into the soil near the base of the plant. Continue steps a - e at each container. Tips: Containers over 12” in diameter may require more than one dripper for adequate coverage. To avoid over-watering or wasting water, containers are often watered for shorter durations but more frequently than inground plants. Remember the 200/200 Rule for ½” poly tubing: maximum 200’ run lengths and 200 GPH (gallons per hour) total flow; 30/30 Rule for ¼” tubing: maximum 30’ run lengths and 30 GPH total flow. See the Tubing Buying Guide for details of tubing capacity.
If you live in an area where the temperatures drop down to below 37 degrees Fahrenheit you must winterize your system. See our Winterizing Instructions.
Ultimate Drip Irrigation Kit for Container Gardening Instructions
Congratulations on your purchase of an Ultimate Drip Irrigation Kit for Container Gardening with ½” Mainline from Drip Depot!
Please take a few minutes to read through these instructions and familiarize yourself with all the parts. For assistance with part names and details, you can print the list of parts included in your kit from the Kit item page on our website.
Drip Depot Irrigation kits are modular in design, as no two gardens are completely alike. Should you have any questions while installing your kit please feel free to email our Customer Support team or review some of the many resources in our Education Center, found under the "Learn" tab in the menu bar on our website.
This kit utilizes ½” (.600” ID x .700” OD) poly tubing as the mainline making it a great choice for large decks and patios with container plants located farther than thirty feet from the water source or requiring more than 30 GPH total flow. It also includes two complete Head Assemblies for connecting to two different water spigots. Your kit includes items you may not need for your specific design but are included “just in case”.
Couplers for the ½” poly tubing are included “just in case” your design requires coupling two sections of ½” tubing together or as in making a repair.
Two ½” tees are included “just in case” your design requires you to split your ½” mainline tubing in two different directions. If so, the kit does include four ½” tubing end caps.
Both ¼” and ½” elbows are included “just in case” your design requires tighter 90 degree turns in your tubing layout.
¼” Goof Plugs are included “just in case” you need to plug a hole that you punched into the mainline tubing that leaks or is no longer needed. Goof plugs are also used to close the ends of ¼” micro-tubing.
Several ¼” tee connectors are included “just in case” you have containers larger than 12” that will require more than one drip emitter. You can use the tee in the section of ¼” tubing to split in two.
Adjustable drippers on stakes are included “just in case” you have any water hungry plants in the same system zone with your other containers. These can be adjusted from zero up to twenty gallons per hour.
A Faucet Y Connector can be used to split the water spigot or head assembly into two separate manually controlled outlets.
Barb Tubing Coupling Valves for ¼” micro-tubing can be used for on/off control of any run of micro-tubing or drip line or as a drip emitter with variable flow by opening/closing as needed.
1. Installing your Head Assembly. Drip Depot Kits come standard with garden hose thread components for easy connection to your outdoor spigot or garden hose. Hand tighten only, no teflon tape or pipe dope required with hose threaded connections.
Install the Backflow Preventer also known as a Hose Thread Vacuum Breaker, included in your kit, to the outdoor spigot. Ensure this item has the rubber washer seated completely down inside the female threaded connection prior to installation.
Next, install the Filter, included in your kit, to the vacuum breaker or backflow prevention device. Please ensure the rubber washer is seated completely down inside the female threaded connection prior to installation.
The Pressure Regulator is installed after the filter. Again, ensure the rubber washer is seated completely down inside the female threaded connection prior to installation. Please note the directional flow arrow on most pressure regulators for proper installation.
Lastly, the Female Hose Thread Tubing Adapter is installed on the outflow side of the pressure regulator. A helpful tip is to connect your tubing to the tubing adapter prior to connecting to your head assembly components. Most tubing adapters have a female swivel end for ease of installation.
*Please note: If using a hose-end water timer to automate your drip system the Head Assembly must be installed after or downstream of the timer or valve. Drip irrigation products are not rated for constant pressure use.
2. Mainline Tubing Installation Determine the best location(s) for your ½” mainline to reach from the water source to near the last container to be watered.
Connect mainline tubing to head assembly.
Lay out your ½” mainline tubing. If installing along wooden structures, your kit includes tubing clamps with nails to secure the tubing in place. Please note: The ½” poly is flexible and can be laid out with slight curves or “S” shaped zigzags if necessary.
Cut off any excess tubing.
Flush the line(s). Allow water to run through tubing to remove any debris that may be inside.
Install the Perma-loc Tubing End Cap(s) to close the line(s).
Repeat head assembly and mainline installation steps for additional zones.
3. Installing the Feedlines and Drippers
Punch a hole into the mainline, near the container, using the ¼” punch tool included in the kit.
Cut a section of ¼” micro-tubing to reach from mainline to inside the container.
Attach a ¼” barbed coupler to one end of the micro-tubing and insert the barbed coupler into the hole you punched in the mainline. You should hear a snap or click once the barbed coupler is inserted correctly.
Attach the barbed inlet of a dripper to the other end of the section of micro-tubing.
Snap the dripper end of the micro-tubing into a Stabilizer Stake and push the stake into the soil near the base of the plant.
Continue steps a - e at each container.
Tips:
Containers over 12” in diameter may require more than one dripper for adequate coverage.
To avoid over-watering or wasting water, containers are often watered for shorter durations but more frequently than inground plants.
Remember the 200/200 Rule for ½” poly tubing: maximum 200’ run lengths and 200 GPH (gallons per hour) total flow; 30/30 Rule for ¼” tubing: maximum 30’ run lengths and 30 GPH total flow. See the Tubing Buying Guide for details of tubing capacity.
Dripline is poly tubing with built-in drip emitters spaced evenly throughout the line. Dripline is commonly used in closely planted spaces like raised beds and window boxes, under shrubs, in ground cover areas and making tree rings.