Drip Irrigation Kit for Vegetable Gardens
Congratulations on your purchase of a Standard Drip Irrigation Kit for Vegetable Gardens from Drip Depot! Please take a few minutes to read through these instructions and familiarize yourself with all the parts. For assistance with part names and details, you can print the list of parts included in your kit from the Kit Items in our build your own kit page. In the drop down just select the correct kit size for what you need and see the full list of what is provided. Drip Depot Irrigation Kits are modular in design, as no two gardens are completely alike. Should you have any questions while installing your new kit please feel free to email our Customer Support team or review some of the many resources in our Education Center, found by clicking the "Help" button in the menu bar on our website. The Vegetable Garden Kits utilize 1/2" (.600" ID x .700" OD) poly tubing as the mainline. The Vegetable Garden Kits include several different emitting devices to water your plants, including individual drippers, poly drip line with evenly spaced factory installed drip emitters and some larger kits include thin walled drip tape with factory installed drip emitters. Individual Drippers are used to water individual plants that are normally spaced farther apart or where a run of drip line or drip tape would not be practical, such as tomato, pepper, squash, cucumber etc. Drippers with barbed inlet connections can be inserted directly into 1/2" or larger mainline tubing or inserted into the ends of 1/4" micro-tubing to reach plants that are not near your main or lateral lines. Drip Line included in many of the kits is flexible 1/4" (.170" ID x .250" OD) poly tubing with drip emitters factory installed at specific spacings.
Installing your Head Assembly - Drip Depot Kits come standard with garden hose thread components for easy connection to your outdoor spigot or garden hose. Hand tighten only, no teflon tape or pipe dope is required with hose threaded connections.
Install the Backflow Preventer also known as a Hose Thread Vacuum Breaker, included in your kit, to the outdoor spigot. Ensure this item has the rubber washer seated completely down inside the female threaded connection prior to installation.
Next, install the Filter, included in your kit, to the vacuum breaker or backflow prevention device. Please ensure the rubber washer is seated completely down inside the female threaded connection prior to installation.
The Pressure Regulator is installed after the filter. Again, ensure the rubber washer is seated completely down inside the female threaded connection prior to installation. Please note the directional flow arrow on most pressure regulators for proper installation.
Lastly, the Female Hose Thread Tubing Adapter is installed on the outflow side of the pressure regulator. A helpful tip is to connect your tubing to the tubing adapter prior to connecting to your head assembly components. Most tubing adapters have a female swivel end for ease of installation.
Please note: If using a hose-end water timer to automate your drip system the Head Assembly must be installed after/downstream of the timer or valve. Drip irrigation products are not rated for constant pressure use. Many municipal codes require the use of anti vandalism protection (set screw) on an outdoor water spigot backflow preventer. The J10 with locking screw may qualify when properly installed directly on the hose bibb. If used on an automatic water timer for your irrigation system we recommend not tightening the screw as the plastic threads of the timer can be permanently damaged if the backflow device is removed. 2. Mainline Tubing Installation - Determine the best location for your 1/2" mainline to reach from the water source to your garden area. The flexibility of Drip Depot kits allows you to run the header row however best fits your garden design. This can simply be along the top or side of the garden, through the center for a large garden, or whatever works best for you.
3. Installing the Feedlines and Drippers - This kit includes individual drippers and micro drip line. Individual drippers are usually used to water single plants, such as tomatoes, peppers etc while the dripline is great for rows of more densely planted crops like beans, peas, lettuces and more. Remember the 30/30 rule for 1/4" tubing: maximum single run limit of 30' and no more than 30 GPH flow per single run. Drip Line Installation:
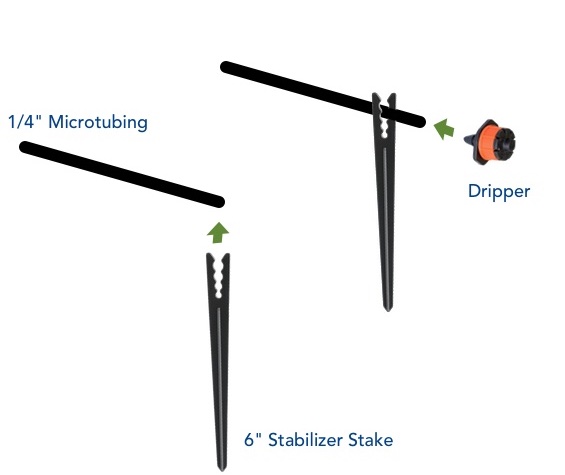
Micro-tubing with dripper Installation:
Note: Water hungry plants may require additional drip emitters or a higher flow dripper to meet their needs. Tips